Introduction
Introduction
Section titled “Introduction”This manual documents the full assembly, first boot, BIOS setup, Windows 11 Pro installation, driver installation, baseline testing, troubleshooting, and maintenance process for the custom gaming PC build.
The build uses an AMD Ryzen 7 7800X3D, Gigabyte B850 AORUS Elite WiFi7 motherboard, DDR5 memory, Samsung NVMe storage, Gigabyte Radeon RX 9060 XT graphics, ARCTIC 360mm liquid cooling, Lian Li O11 Dynamic Mini V2 Flow case, and ASUS TUF Gaming 1000W Gold power supply.
Purpose
Section titled “Purpose”Give a first-time builder a complete, hardware-specific build path that can be followed in order and maintained as the PC evolves.
Estimated Time
Section titled “Estimated Time”Use the following planning estimate:
| Phase | Estimated time |
|---|---|
| Reading and preparation | 1-2 hours |
| Physical assembly | 3-5 hours |
| First boot and BIOS | 30-60 minutes |
| Windows and drivers | 1-2 hours |
| Benchmark and validation | 1-3 hours |
Difficulty
Section titled “Difficulty”Beginner to moderate. The main care points are AM5 CPU handling, DDR5 memory seating, thick 360mm radiator clearance, motherboard power routing, and BIOS/EXPO sequencing.
Required Tools
Section titled “Required Tools”- Phillips #2 screwdriver.
- Precision screwdriver or bit kit.
- Anti-static wrist strap.
- Screw tray or labelled containers.
- Cable ties or hook-and-loop straps.
- Flashlight or head torch.
- Windows 11 Pro USB installer.
- Keyboard, mouse, monitor, and display cable.
See Tools and the Bill of Materials for Amazon UK examples.
Warnings
Section titled “Warnings”- Read the relevant chapter before opening or installing that component.
- Do not build on carpet.
- Do not touch CPU socket contacts, CPU pads, memory contacts, or SSD edge connectors.
- Do not reuse modular PSU cables from another power supply.
- Do not enable EXPO before the system boots successfully at default settings.
- Do not update BIOS unless there is a documented reason.
- Keep invoices, serial numbers, and personal licence information private.
Step-by-Step Instructions
Section titled “Step-by-Step Instructions”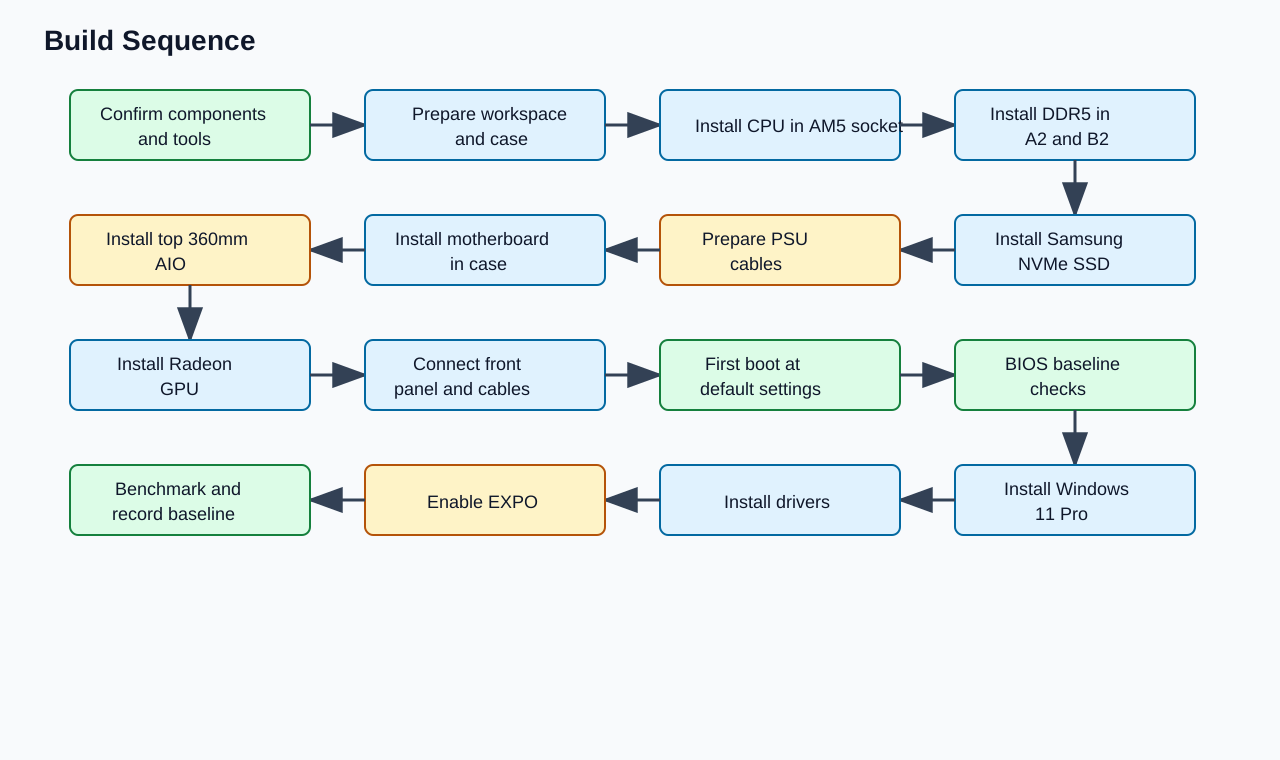
Diagram source: build-sequence.mmd
- Review the build specification in Components.
- Confirm the exact locked component models in the Bill of Materials.
- Gather tools and prepare the workspace.
- Install CPU, memory, and SSD on the motherboard before the board goes into the case.
- Prepare the case and PSU cable paths.
- Install the motherboard, AIO cooler, graphics card, and front-panel connectors.
- Perform first boot at default settings.
- Configure BIOS only after hardware is detected.
- Install Windows 11 Pro from the USB installer.
- Install drivers from official sources.
- Enable EXPO and validate stability.
- Record temperatures, benchmarks, BIOS version, and driver versions.
Verification Checklist
Section titled “Verification Checklist”- You understand the full build order.
- Required tools are available.
- Windows 11 Pro USB installer is available.
- Component model numbers are confirmed.
- RAM and SSD model numbers match the locked bill of materials.
- The first boot plan keeps EXPO disabled until default stability is confirmed.
- Benchmark and maintenance records will be kept after assembly.
Common Mistakes
Section titled “Common Mistakes”- Treating retailer titles as a substitute for model-number verification.
- Building without a screw tray and losing M.2 screws.
- Installing the top radiator before routing CPU EPS power.
- Plugging the monitor into the motherboard instead of the GPU.
- Changing BIOS settings before confirming default boot.
- Failing to record the stable baseline once the build works.
Expected Result
Section titled “Expected Result”You know the build sequence, required tools, key risks, and validation path before beginning component installation.
Next Chapter
Section titled “Next Chapter”Continue to Components.